


Schitterend news
At the request of Nimeto (famous institute for painters in Utrecht, The Netherlands) Erik Winkler has written a series of articles over the past year. Under the name 'Stories Behind Glass’ the first volume appeared in March 2012. Erik described in that first article the history of glass as a medium for decoration painters of ‘the old days’. In the second article (July 2012) Erik described various glass processing techniques. The technique of decorative glass gilding was explained extensively in the third article (December 2012). In the fourth and final article, Erik tells more about intensifying the gold leaf effect behind glass by using glass techniques such as etching, grinding, brilliant cutting, sandblasting, painting and various other decorations.
Shining effect by relief
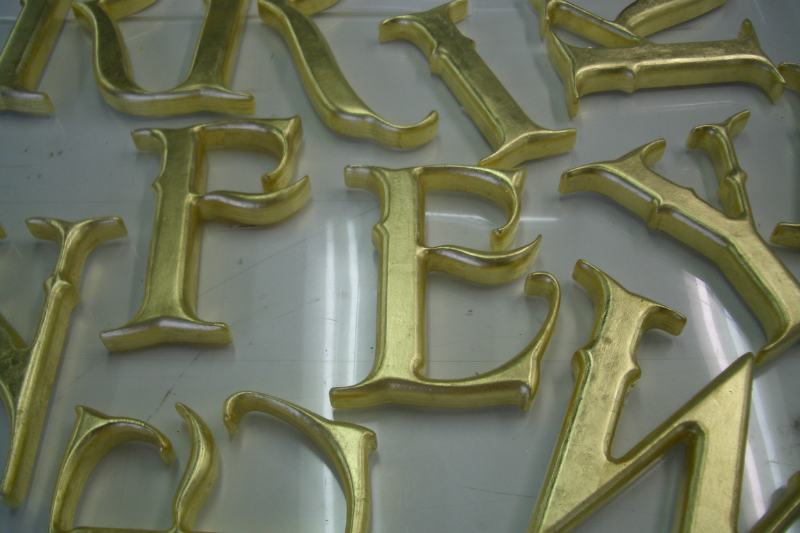
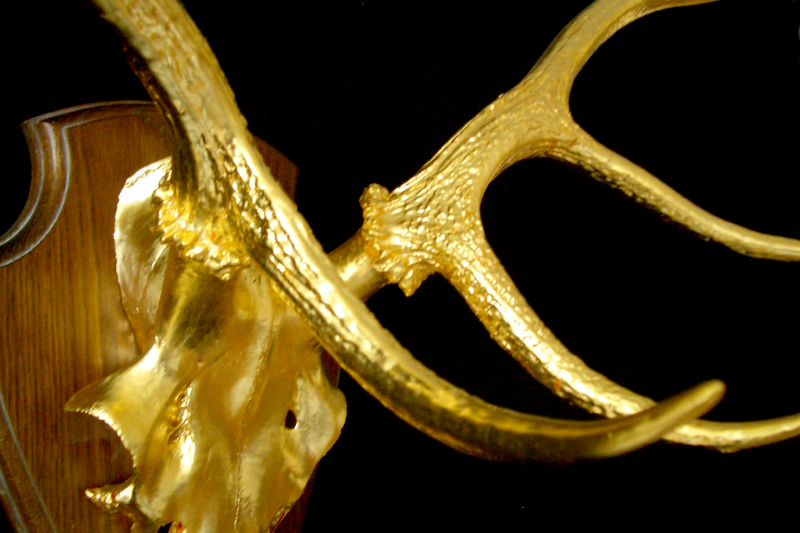
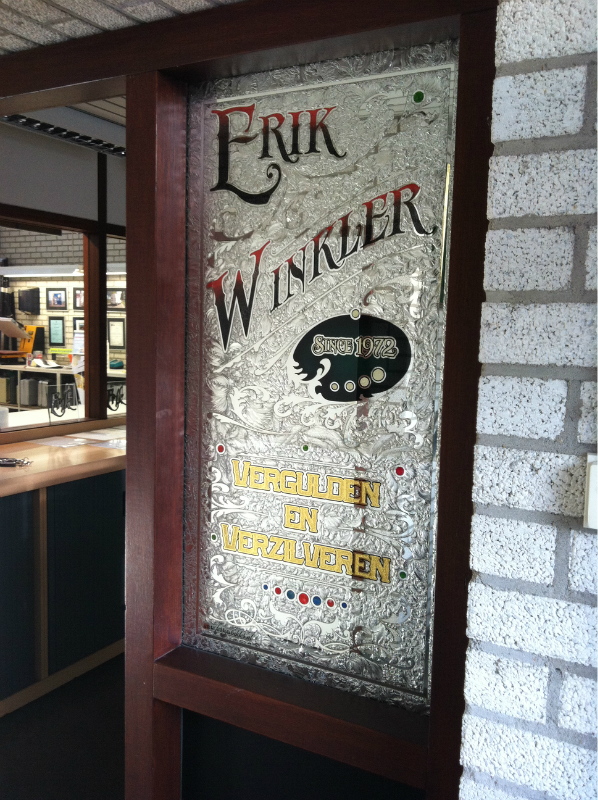
I first want to show how one-dimensional surface gilding looks like (photo 1). Gilding only comes into its own when the surface is embossed, so that not only one light reflection can be seen, but lots more. Photo 2 shows you an example of that in the form of cut out 3D letters. Another example is photo 3, it shows a deer antler. Both letters and the deer antler I gilded a few years ago. Compared to the first photo the 3D letters (also pictures 4, 5 and 6) and the antlers seem to shine a lot more. This is due to the relief. That is why I emphasize that it is very important to add a relief to the surface of the glass you want to gild.
The different ways to provide a relief to glass, for example by grinding, etching, engraving or sandblasting, thus give the gilded or silvered glass a much more striking effect of glare and therefore a greater attention.
Enlarging attention value
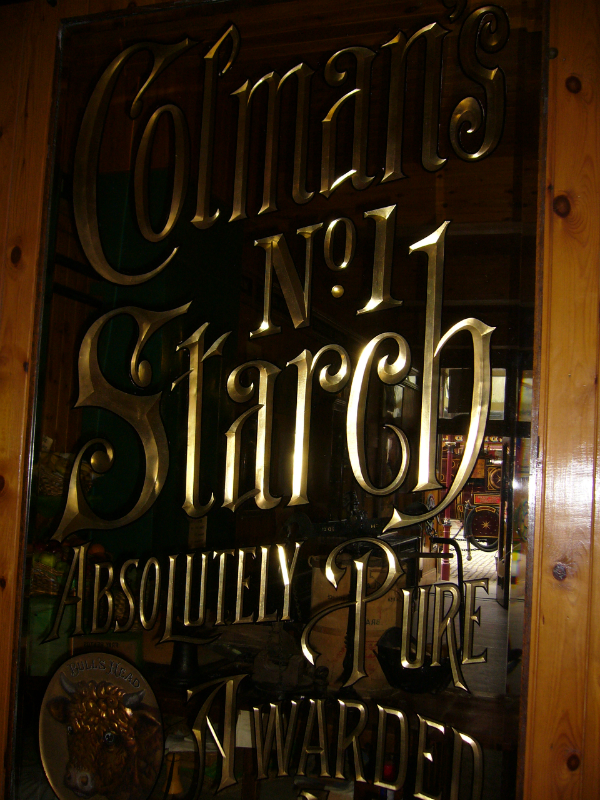
When manufacturing advertisements on windows, painters wanted to make sure the promotional message had allure and attention value. Such a promotional item had to be noticed obviously. This was done not only by giving the glass relief as mentioned above, but also by adding different colored (3D) characters and painting shadows, gradients, and ornaments (photos 7 and 8). Images were painted in mirror directly behind the glass (photo 9). A painter had to think and paint in reverse, because what normally is painted last on a painting, must be painted first when painting glass.
A la Française
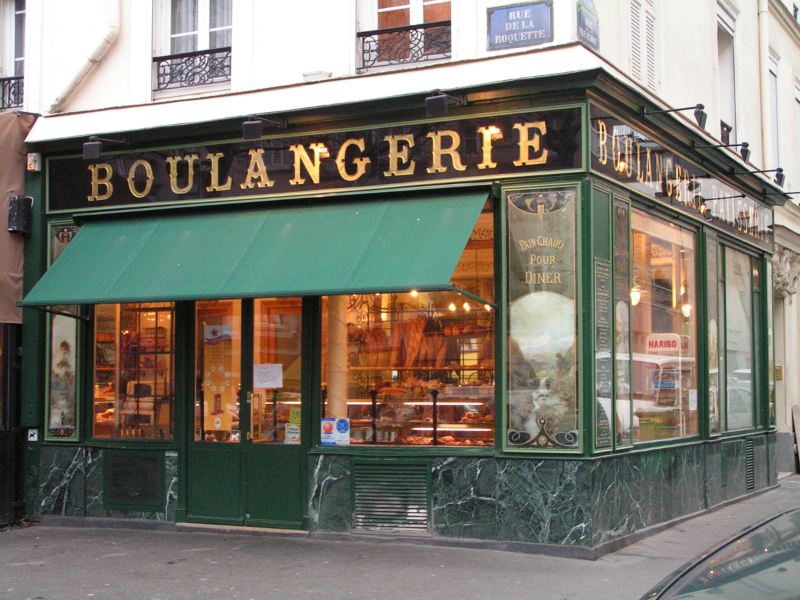
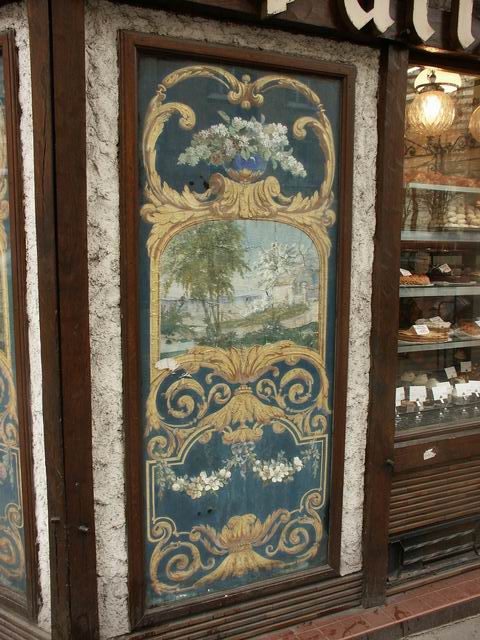
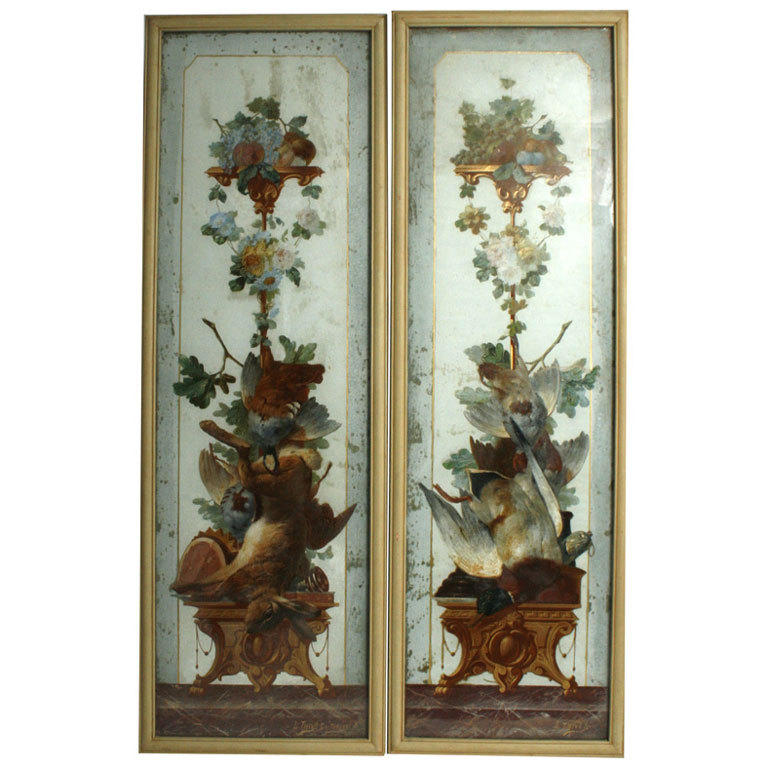
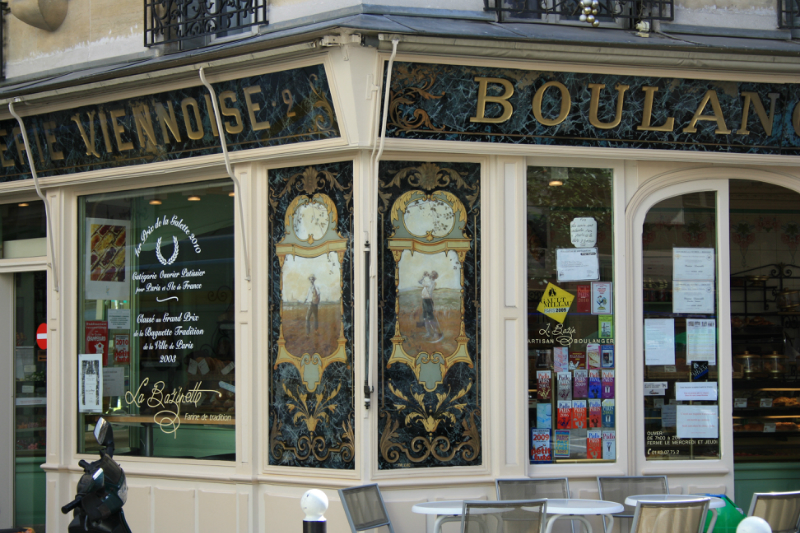
In France, particularly in Paris, it was from 1840 to the present days common to paint images not on (or actually "behind") the glass, but on canvas. That canvas was then placed behind the glass. During my research in Paris, I studied various facades and interiors of bakeries. Many bakeries were, some even over a 100 years, established in the same building. The decorations on the facades were often equally old. Photo 10 is a good example of this: You see a hand painted piece of canvas that is placed on the back of a glass panel and then attached outside of the shop. The panel hangs next to the entrance of the bakery. The effigy entices the passerby to step inside, because a store that is so beautifully decorated from the outside, múst sell delicious baguettes. In photo 11 you see two similar pieces of painted canvas, but they are, given the image, not for a bakery but for a volailler or poulterer.
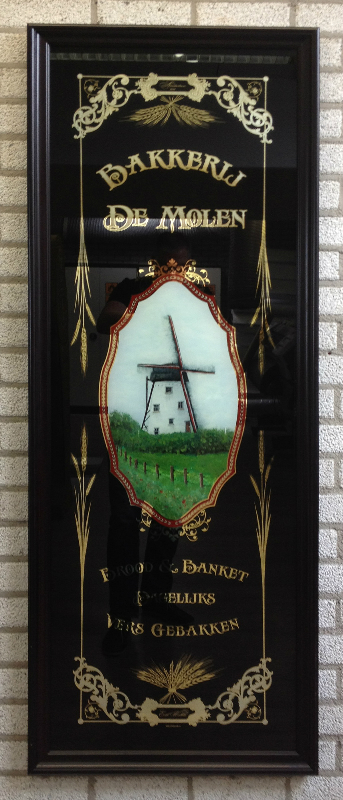
Photo 12 is a glass advertising panel, made by yours truly, for a Dutch bakery, including a handpainted windmill on canvas, inspired by the French style.
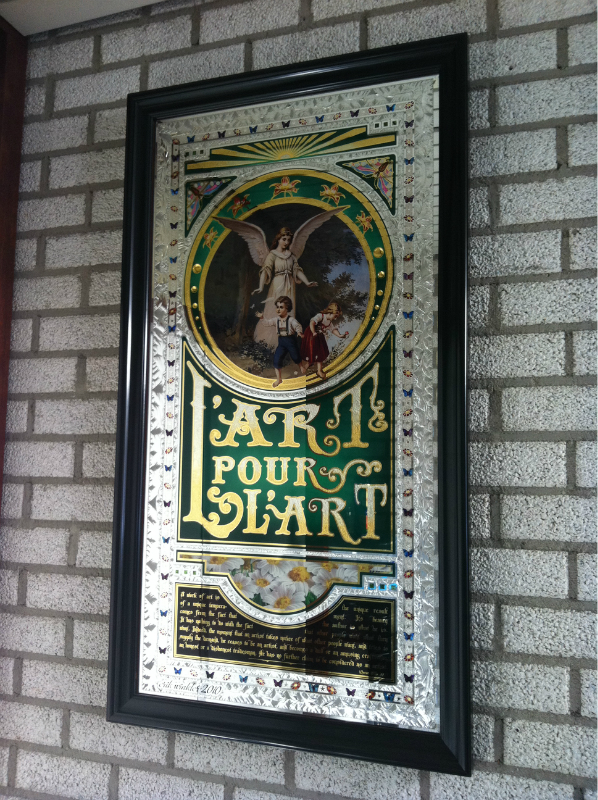
Another example of canvas behind glass you can see on photo 13. This is a detail of my artwork l'Art pour l'Art, in which the high-gloss plated line enclosed the feet of the two figures painted on canvas. Unlike the French style I applied gold leaf on the etched and embossed glass.
Other decorative techniques
Imitation marble painting:
There are other ways to decorate glass on the reversed side. One is painting marble imitations. This can be seen in photo 14: once again a bakery in Paris, with glued on the backside of the glass panels imitation marble and gilded 3D letters.
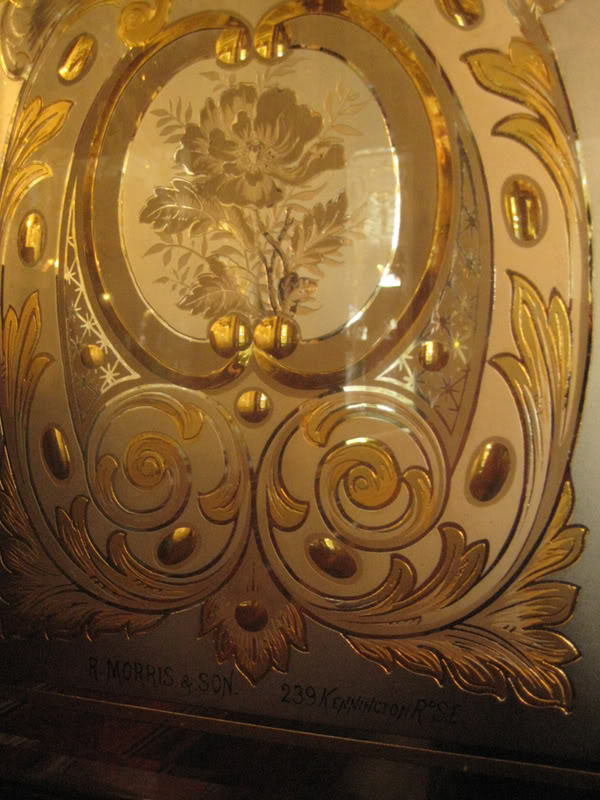
Silvering:
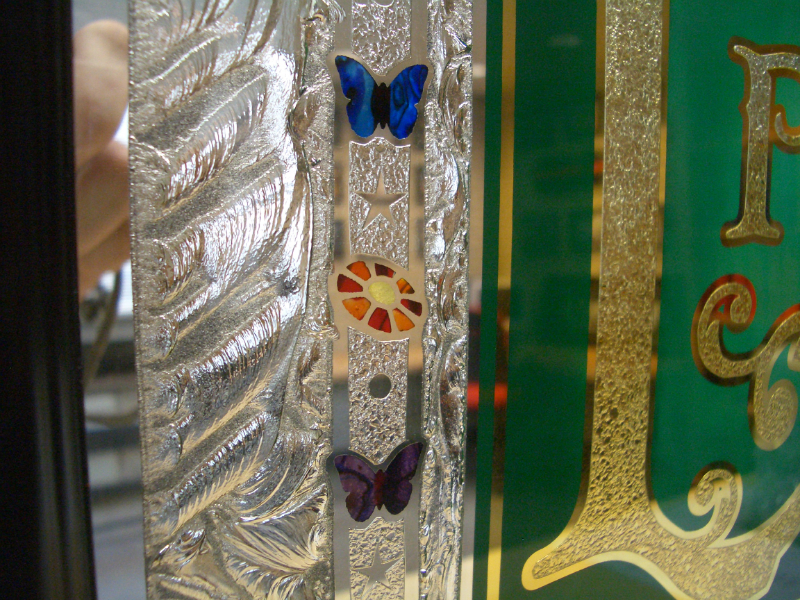
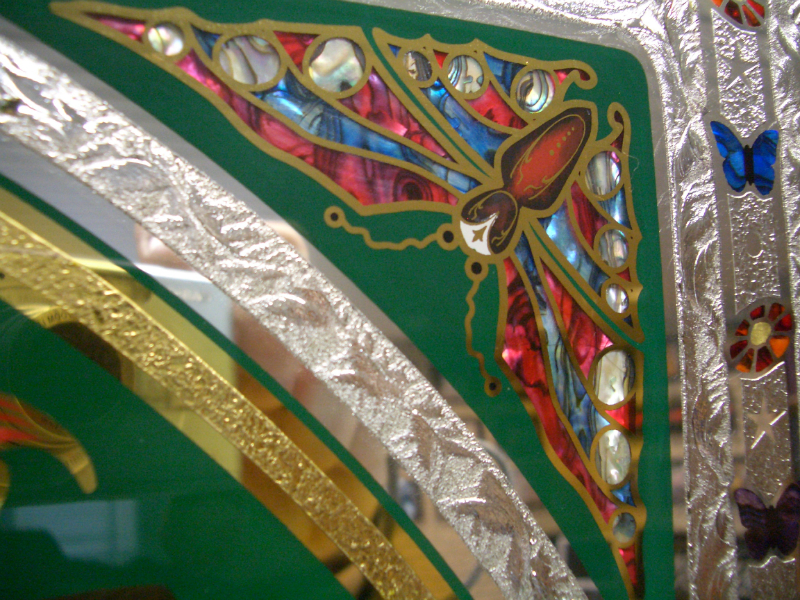
Silvering is also a valued technique. Not only to create a mirror effect, but also as a beautiful sparkly effect on embossed glass. The making of relief on glass is to be seen, for example, on the etched door window in 15 photo, or the Mousseline sandblasted fanlight window in photo 16. When you are gonna silver relief glass (photos 17, 18 and 19), some great effects can be seen. This is among other things to be see in picture 20, a detail of my artwork l'Art pour l'Art. The two butterflies and flowers are lying in a strip of etched glass which was chemically silvered. To the right and to the left of the etched glass strip, the glass is decorated with a different technique: there the glass is chipped, on the basis of a specific method, so that the feather-like fragments emerge. Because the glass was also silvered in those areas, quite a stunning effect is created. Photo 21 shows a glass panel that is to be found in my studio at the Stammerkamp 14 in Diemen (The Netherlands). This glass panel is a combination of etched and broken glass that was silvered and gilded.
Combining silvering and gilding:
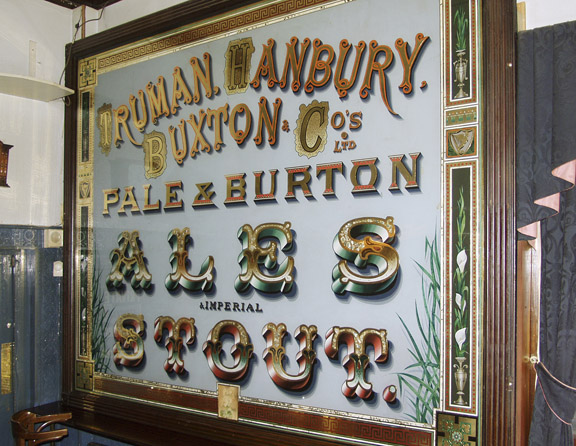
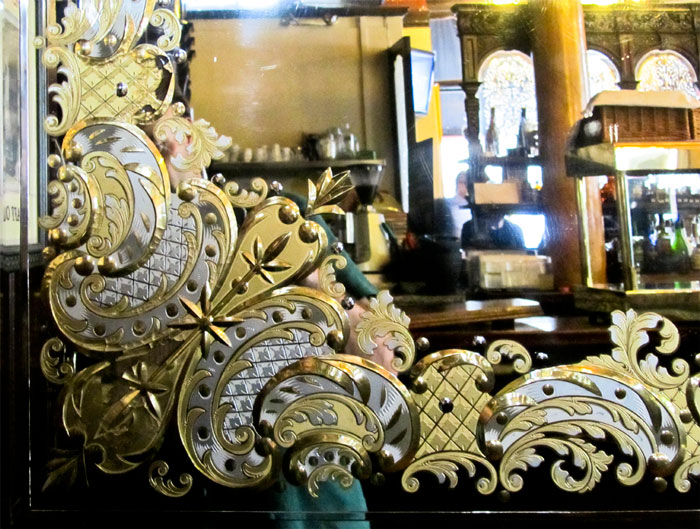
Except sandblasting and etching, glass can also be brilliant cut and engraved. And besides silvering it is also possible to combine this with gilding. A combination of all these techniques can be seen on the decorative mirror in a Victorian bar in London (photos 22 and 23).
Pearl applique:
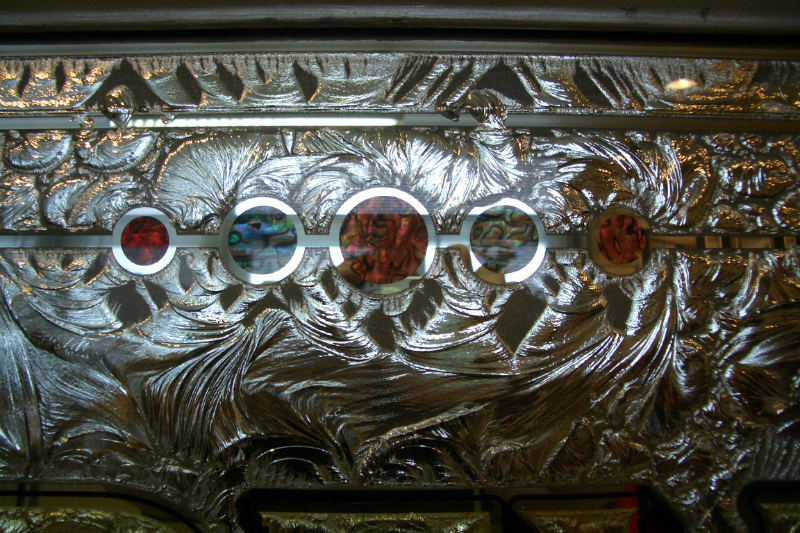
A very special technique is the applying mother of pearl. The big butterfly, little butterflies and flowers in photo 24 were inlaid with abelone shell. Those pieces were inlaid with the greatest precision and a fixed hand, as at the front of the glass panel (l'Art pour l'art) shows. Also photo 25 shows mother of pearl pieces behind glass.
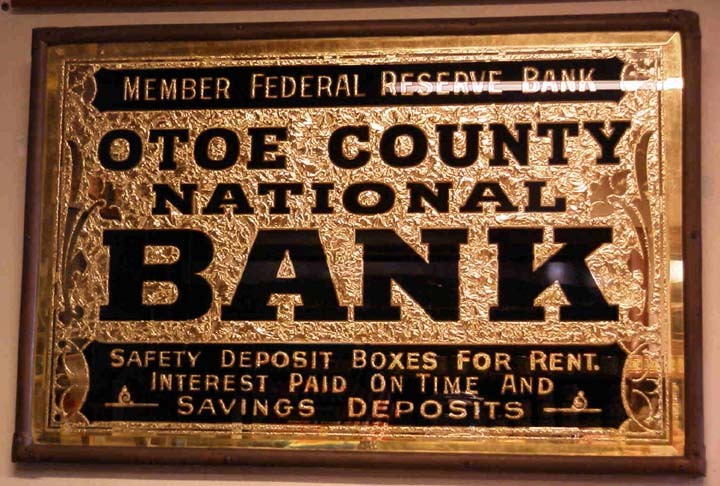
Not on the back side, but on the front side
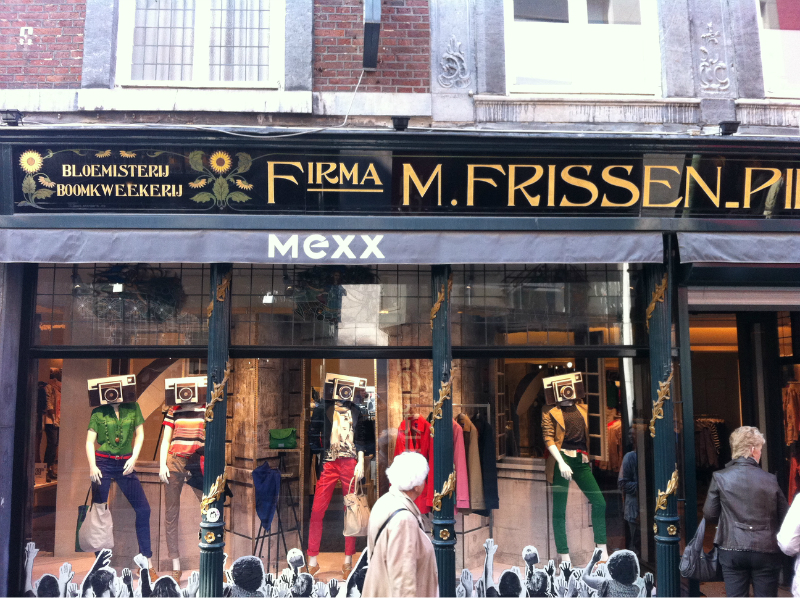
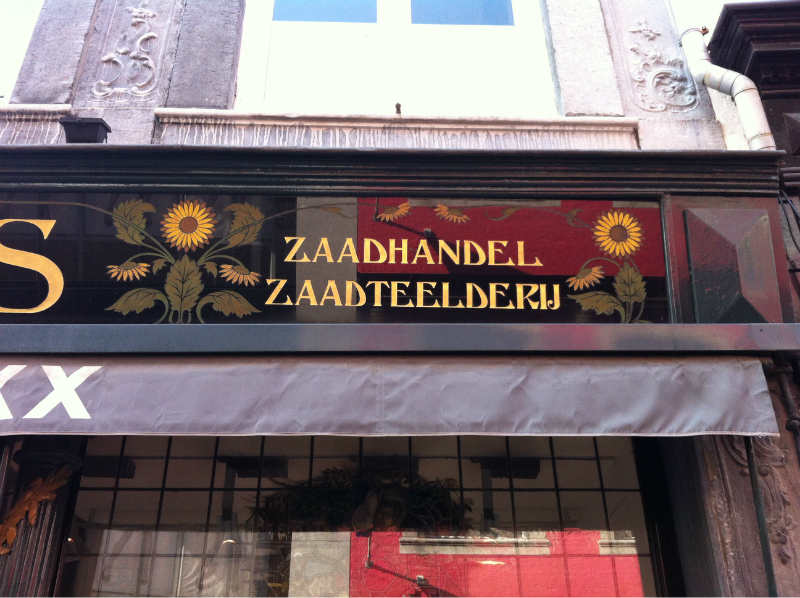
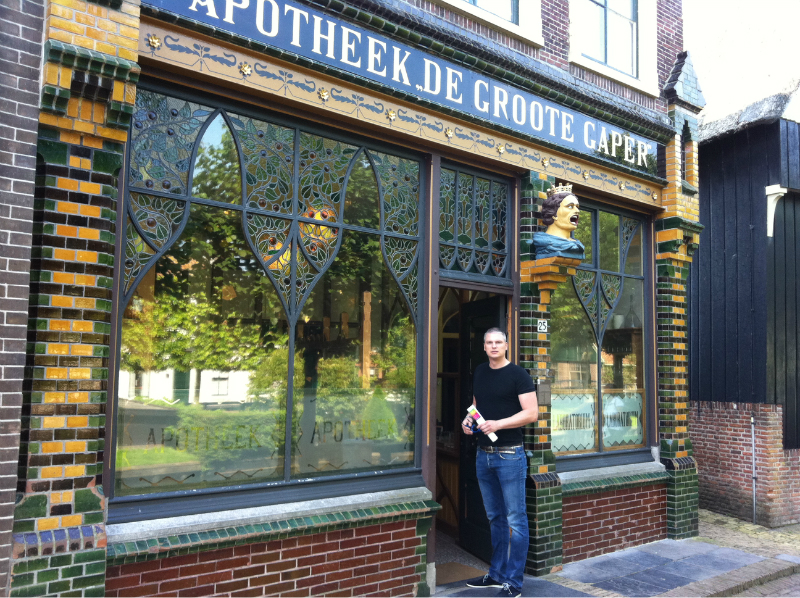
In The Netherlands decorating glass for promotional purposes was a bit more conservative, as I already described in article 1. In the period from about 1890 to about 1925 there were two Dutch companies that delivered black glass to decorative painters. That black glass was sandblasted on the front side with a motif or text and then manually painted or gilded. This technique was mainly used for shop facades, tombs and entrance signs. Good examples are to be seen on the facade of a clothing store in Maastricht (photos 26 and 27), formerly a florist / seed shop. Also photo 28 shows a good example of a sandblasted and gilded black glass facade of a pharmacy in the Zuiderzee Museum in Enkhuizen (The Netherlands).
Eye candy
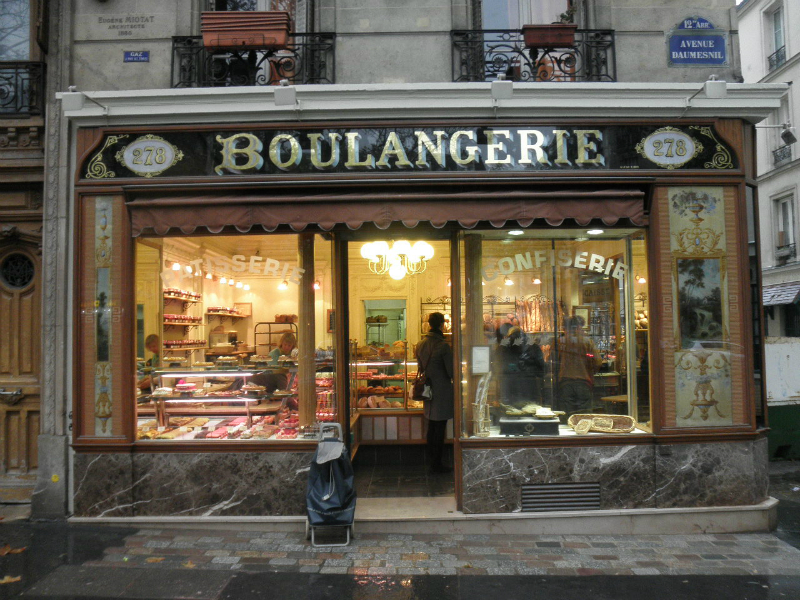
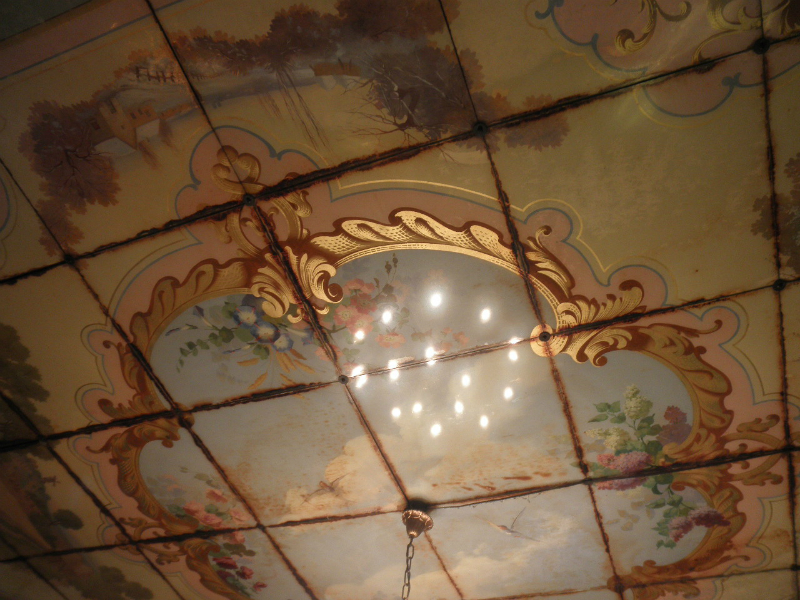
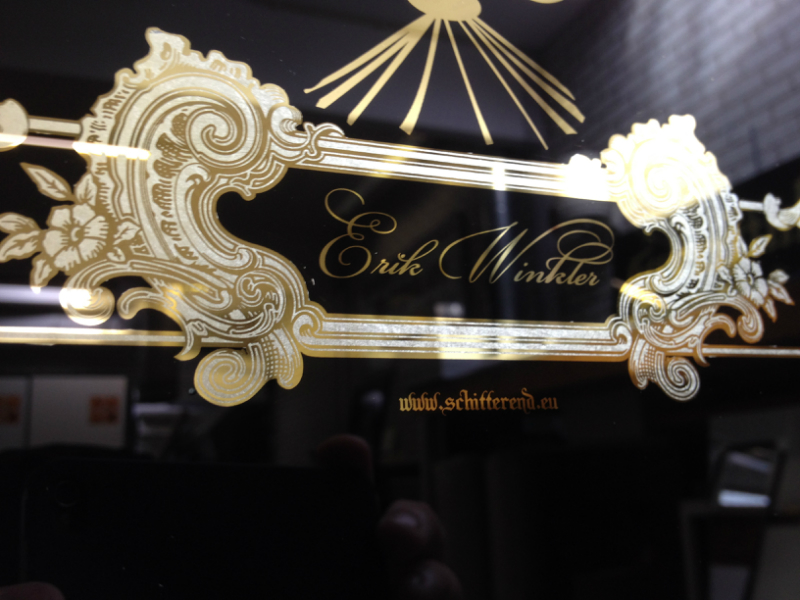
During the preparation for this article, I went through my archives to find matching photos with the intention to submit a modest selection. But it was a difficult choice because there are so many beautiful pictures I do not want to deny you. For example, pictures of my aforementioned trip to Paris, where I studied the facades of boulangeries and charcuteries (butchers). The way in which they showed their product both on the outside (photos 29 and 30) and on the inside (31, ceiling) is a true inspiration for me. Photo 32 shows my own work, in which I chipped the back of glass and subsequently silvered it. Photo 33 is a complete picture of the aforementioned artwork l'Art pour l'Art. Photo 34 is a detail of the aforementioned advertising glass 'Bakery the Mill', in which the very thin lines (only 1 mm thick) of my signature and surrounding ornaments were gilded by hand. Photos 35 and 36 are two fantastic antique works of American masters from between 1880 to 1900. Do you already recognize the techniques they used? Can you distinguish them?
Sweet of the week
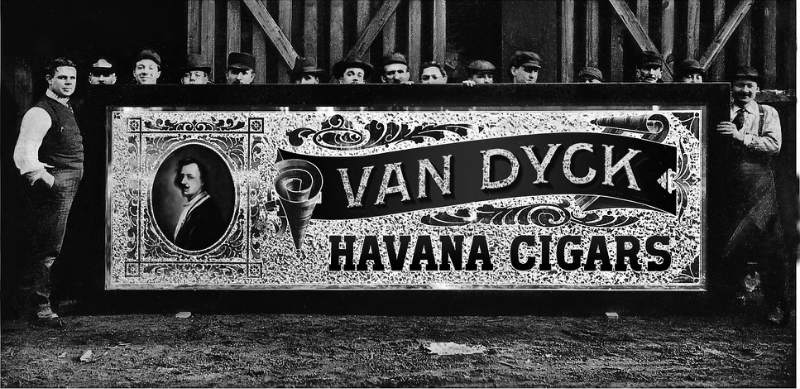
I would like to end this fourth article with a beautiful photo (37), if I may say so myself. At the time of the Wild West, when streets were not even paved, there was a workshop in Chicago that made life-size commercials on glass. In the picture you can see an example of a very large window which shows an effect of chipped at the rear side of the glass. Then the relief of the glass was silvered, the scripts were gilded and the portraits and gradients in the band were painted by hand. And everything on the back side of the glass as mentioned before. Interesting to mention is that the people in the photo were employees of that workshop. Each had its own specialization and has thus contributed in creating this beautiful panel. It is obvious that they are very proud of their work. And rightly so.
Schitterend techniques
Unfortunately this already is the last article of the series "Stories behind glass'. I hope you enjoyed it. For more information about the decoration techniques used by me or to view more photos, take a look at the page Other techniques.
